


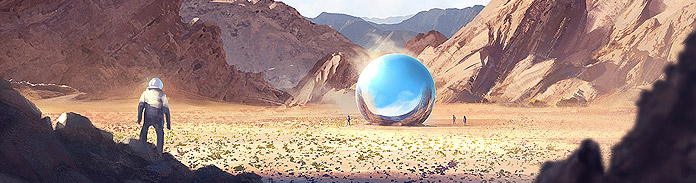
Photoshop digital painting tutorial: Desert Superstructure.

Welcome to the first digital painting tutorial here at stay in wonderland. This time we’re in the world of digital sci fi art and I guess in the vicinity of my beloved 70s sci fi style. Not smack in the middle of the genre but this painting has elements of ‘old sci fi book cover’ about it.
The first thing to think about before starting is getting some kind of idea of what your painting is going to look like. Even a vague one. I had a few false starts with this one because I was just wanting to see where ‘the brush took me’. So I decided I wanted to create some kind of 70s sci fi desert scene. I wanted blue skies and orange sand. This gave me some degree of focus and direction.
Step One: keeping it loose

So here I threw in a few basic colour gradients for the sky and the ground then started messing around with some large brushes, then when I noticed some form taking place, threw in the beginnings of some light and shade via rock formations. I didn’t intend to make anything specific, the rocks just kind of happened through the scribblings.
Step Two: smoothing and texture

Now I’m starting to make those rocks look a bit more firm. I started tightening up a little early on here (i.e. adding detail) but I just wanted to play with the terrain. I used the smudge tool to treat the paint like it was oil based. I then added some grain via some dirt brushes to make the sand look less smooth.
Also started to mess around with sky detail and threw in some distance fog.
Step Three: let’s rock

Those rocks looked too deliberate so I made loads more and scattered them around. Also that rocky outcrop on the right needed to be less isolated so I created a second on the left. Bit of a rocky photo texture thrown on that too. Again, more smudging on the rocks and stones.
In the distance I started to create a little village or settlement to give some scale.
Step Four: the sci fi superstructure

Now it’s time to add the sci fi element to our digital painting. I got a square brush and started to drag straight lines (Shift + drag). The tone had to be very muted as the structure was way off in the distance and of a dark matte material.
Step Five: a bit of water

Here I was going for a very shallow and almost dried up stream or wadi. I added some shadow to the right edge and some highlight to the left edge to lift it (or sink it in as it were). I also copied and pasted some of the rocks, flipped them and faded them out to create some subtle reflections.
The water itself was created by just making a rough selection using the lasso tool, making an adjustment layer using brightness/contrast and basically darkening the sand underneath to give it a damp look. This covered the large rocks so I painted a hole in the adjustment layer’s mask so they were excluded from the damp contrast effect as they sit on top of the water.
Step Six: improving the sky

I just wasn’t happy with the sky at all. So I took a photo and placed it in there. I also didn’t like the settlement so out it came. You can see a couple of small weeds growing too.
The superstructure got a bit more attention as well. A few details here and there, some shadows and some more fading as though there was a bit of a sand storm off in the distance. Also added some smoke vapours coming from within the structure.
Step Seven: finishing touches
I didn’t like the idea of having the sky photo do all the work, so I airbrushed it out using a cloud brush. Then added a few more structures to the main one that were linked via massive cables.
And that’s that! Hope you enjoyed this digital sci fi art tutorial. Stay tuned for more of the same. If you’d like to see a larger version of this picture, just go to the digital art section of my portfolio.
If you want to buy this as a print click here to get it from deviant art. It’s less than a dollar I think!