


In this making-of I’ll be showing you how I used 3ds max & Photoshop to create a 3d/paint-over concept piece…

Here’s the final result:

Making-of overview:
Creating a 3d paint-over like this is, technically speaking, rather simple compared to creating a full 3d image where we’d have to labour over materials and lighting etc. The real work is in getting the shot right, getting the lighting right, colour composition, atmospheric perspective, values and so on.
As such, and considering this painting took me longer than most of my past pieces, there aren’t too many steps in this process. Once a few key things (as mentioned above) have been established, it’s just down to hard work!
So we’ll start with the initial 3d composition tests and then, once the geometry is done, get to the full paint-over process.
Initial steps: where to even begin?!
Actually, this piece started by being incredibly inspired by a concept artist I found called Thomas Pringle. His style is so messy and gritty. Love it.
Here’s one of the images that got me inspired:

When I saw this style I knew it was the kind of direction I’d like to start working towards.
I’d also seen a few demos here and there of concept artists using 3d as a basis. Tutorials were very limited so I kind of had to go it alone.
Gathering Reference:
I gathered a ton of reference. Rather than post a few examples I thought I’d just take a screen grab of my reference/reseach folder! (click for full size)

I always spend a lot of time gathering reference. Not only did I need period architectural reference for the 3d modelling but I also needed decent high-res images for the texture overlays.
Another bonus in terms of reference was that I live in the UK and both my wife and I love tudor architecture and tend to take a camera with us whenever we go for a day out some place old, so I have a fair few 4000px images of tudor buildings!
The biggest challenge for me – and I can’t emphasise this enough – was trying to decide on a fair balance between how much to model and how much to paint! In the following steps we’ll see my journey through that and the methods I used to figure it out as best I could.
PART ONE: Getting ‘the shot’
I knew I wanted fog, I knew I wanted enormous buildings. So I got to work in 3ds max and blocked out the basic shapes, threw in a HDR sky and made the mistake of trying to use Vray for the fog.

Here’s the first render plus the composite of the Z-depth in photoshop. The little pink square represents a human height. This is just something I do to keep scale in mind.

Another render with some more fog added. It was around this time that I started to grow weary of Vray fog – a small test render like this was taking about 30-45 minutes! On the very basic settings too. So I figured that any fog would have to be done in post. It’s vital to do what ever it takes to speed up the process of idea and visual feedback. It needs to be as close to instant as possible.

So, the point of part one is to establish a decent shot. By shot I mean composition. I wasn’t happy with the camera angle before so tweaked it. I tend to get wedded to a camera placement too easily but the last one just wasn’t interesting enough. This again is a render plus some photoshop scribbles/colour tweaks.
Each time I rendered out an image I would mess with it in photoshop to get an idea of its true potential. Remember that even in full 3d scenes, 3d artists see the render as the starting point and not the finishing point.

This is basically the same composition as above but with some basic blocking in of the architecture. The sky wasn’t really working as we have a low sun coming in from the left and the sky is entirely cloudy.

Here we have the final composition. I wanted to really emphasise the large ominous buildings on the right-hand vertical third. In the previous shot the buildings are still more or less on that third but here they’re right on it and we’ve moved the other buildings slightly out of sight so our focal point is way more clear i.e. the huge buildings.
Mission accomplished, now let’s move to part two.
PART TWO: Building the geometry

So I’ve started detailing the buildings here. I was using my reference for ideas on how tall the buildings should be, how the roofs work, the layout of the buildings and so on.

You’ll also notice that there’s a fair bit of ‘photoshoppery’ going on here. Don’t be fooled into thinking this is the actual post process, this is just a) me being a complete render whore (i.e. I just love any chance to finish/polish something) and b) really wanting to know how much needs to be built versus photoshopped.

These renders were pretty quick. Maybe a minute or three. I then set up a photoshop file that was only 1200px wide and all I had to do was drop my new renders in each time and slap on a few more textures.

There was a layer group of ‘weather’ that involved layers of particles and snow on black which I overlayed on top. I liked the idea of the air being cold enough to just see the beginnings of sleet.
I wanted to create a sort of ‘gap of light’ effect on those large buildings rather than have them illuminated their entire length/height. So I created some opacity maps of clouds and slapped them on some huge planes in front of the sun so they’d cast shadowy cloudy shapes on the top halves of the buildings. This just goes some way to adding to the mood of the piece. In such a cloudy sky it would be hard to imagine all of the sun’s light hitting the scene uninterupted by cloud.
Here are the last few render tests…


I used Greeble to add some blocky, random detail to those large buildings – this was very much a ‘throw it together to see if it sort of works’ method. I knew there’d be more to those buildings than this and that there’d be a bit of a struggle later on.
The ground plane has a displacement map of a cobbled stone texture – used from a previous victorian piece. There was also one or two other things I had lying around from the same scene. This is very handy – as you build your own library of models, your process will speed up lots! Same with textures.
In terms of the composition, we have some dark buildings to the left which leads our eye in plus some dark sky to the right which excludes that part of the painting from our immediate attention. As such we’re drawn to the middle of the painting and then down the street and up the buildings. If we fog out the street a little, hopefully we can maintian priority on our intended focal point – the monolithic buildings.
Here are some screen grabs of the scene in 3ds max…


As you can see it looks quite random when you’re not looking right out from the camera. There were lots of Greeble buildings thrown in to just give basic shadow and light to the scene.
PART THREE: Painting and texturing
Now for the fun part. No more crashes and having to wait for renders to finish!
So I rendered out a 3000 pixel image of the above, on black, and saved a tga with the alpha information embedded. I also rendered out the Z-depth as a basic jpeg.

This is the clean render. I then up-scaled it to 4000px. For some reason my 3ds max/computer tag-team likes to lay down and die at a 4000px size but be more or less ok at 3000px.

This is the basic atmosphere/fog.

Here you can see the detailing of the tall buildings. I used photos of cathedrals to texture them, using the photoshop ‘distort’ method. I also made some perspective lines on a separate layer to use as a guide. Quite important to do this.

So this process is identical to the last one where I threw on some photo textures and skewed them in place using the ‘distort’ transform.
I made a colour-correction layer group inside which I had various adjustment layers, some of which had masks painted in to highlight certain areas. For example, I brought up the blues in the sky and the reds to the lower right part of the image to give a nice colour composition of red/blue. I also knew that I was dying to add a big splash of bright red in there somewhere. I figured some red cloth blowing in the wind and you’ll see that come in later.

It’s worth noting at this point that all along I had the intention of a very messy piece. I didn’t want it to look polished. This is, above all, a concept art piece and as such needs to convey composition, mood, lighting and so on but is not the same as an illustration. So I was happy with any rendering imperfections as long as the fundamentals weren’t broken.

Just continuing to add textures. Nothing much more to say about this stage of the process other than I wanted those near houses to look quite detailed and ended up re-working some of the texturing to make them look a little nicer. Each building side is made up of several photographs plus paint-over rather than one big one. In fact, just about each large horizontal beam was placed on seperately from one wood plank texture!

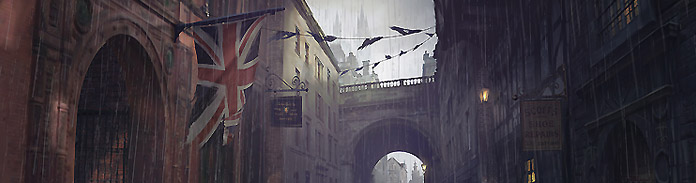
So here’s the red I was talking about. If you take a step back and just look at the colour coming out of the picture, you’ll see a brilliant blue playing off a strong red and this is (for some reason) pleasing to the eye and follows basic colour theory. Think Superman/Spiderman.
I also replaced the sky. The initial one was massively up-scaled and while, again, this is ok for a messy/gritty concept piece, I just had this nagging up-scale feeling deep inside. Ended up doing that with a few overlays actually.

Added people and birds. These were modified photoshop brushes just to get a starting point. I’m big fan of throwing in photos and other media to use as a starting point.
You’ll also notice the large distant buildings. I wanted something vague in the background to imply that these large structures are repeated and that we’re in a Victorian world that isn’t quite business as usual. Just something subtle, perhaps steam-punk esque.

I fought with myself just before this stage as to whether it was done or not. I always wanted to put in a carriage with glowing lanterns but by now I was about two weeks into this thing and starting to flag!
I won’t lie, this was taken straight off google images, magic-wanded and painted over. That said, I think I did a good job of ‘integrating’ it which is a useful skill to have. You see some digital art where stuff just looks ‘plonked in’ and it ruins a piece for me.
And we’re done. Click the above for 1200px image.
I loved doing this piece and look forward to doing many more in this style! It’s a great method to work with and with a bit of practise (plus accumulation of 3d + 2d resources) could be a fairly quick production process.
Stay tuned for more and don’t forget to follow me on Twitter.
Fantastic work ! Thank you ! One of the best tutorials, details and working hard .
Thanks 🙂
Awesome tutorial, helped me so much. Awesome work, too!